Git submodules vs Repo
Overview
In this blog post, we will discuss two different tools to help us maintain multiple repositories that are part of a single project, along with the advantages and disadvantages of each. Specifically, we are going to discuss “git submodules” (https://git-scm.com/book/en/v2/Git-Tools-Submodules) and “repo” (https://source.android.com/setup/develop/repo).
Of course, the first question we may have is why would we ever need to be concerned with multiple repositories? If we’re working on a single project, we would only be using a single repository, correct? Well, there are at least two instances where we may need to use multiple repositories. First, if we’re working across different layers of the “stack” with other members of our group or organization, they most likely will have their own repository that we need to pull in or leverage or vice versa. For example, let’s say we are building a BSP for our custom hardware. We may need to include an application in the BSP to support the manufacturing team’s need to validate the hardware. Instead of directly including the source of the application in the BSP, we may want them to be independent and have the BSP reference the repository of the application This scheme would then allow us to independently develop the BSP and the application.
Similarly, we may wish to pull in third-party source code or library into our application. In this case, we will also need to maintain at least two repositories; one that is our own and the other for the application or library that we wish to pull in.
Git Submodules
We are first going to discuss “git submodules”. Using git submodules does not require any additional tools; it is inherently built into git. Let’s assume we have three non-empty repositories. The first, called “Parent”, will be the “main” git repository that will contain the other git repositories as submodules. “Child1” and “Child2” will be git repositories that will be contained inside the “Parent” repository.
To understand how to add git repositories as git submodules, we will assume that the “Parent” repository has already been cloned. To add the “Child1” and “Child2” repositories, we will need to execute the following commands in the directory where the “Parent” repository has been cloned:
$ Parent> git submodule add <Child1_URL>
$ Parent> git submodule add <Child2_URL>
$ Parent> git status
On branch master
Your branch is up-to-date with 'origin/master'.

Changes to be committed:
  (use "git reset HEAD <file>..." to unstage)

     new file:   .gitmodules
     new file:   Child1
     new file:   Child2
If we look at the contents of the .gitmodules file, we see the following:
$ Parent> cat .gitmodules
[submodule "Child1"]
 path = Child1
 url = git@github.com:mbilloo/Child1.git
[submodule "Child2"]
 path = Child2
 url = git@github.com:mbilloo/Child2.git
Every submodule entry, referenced by its name and enclosed in the square brackets, contains the path of the directory where the submodule will be cloned and the URL of the repository itself.
If we commit and push up the changes and run “gitk” we see the following (gitk is a useful tool that provides a graphical representation of the history of our git repository):
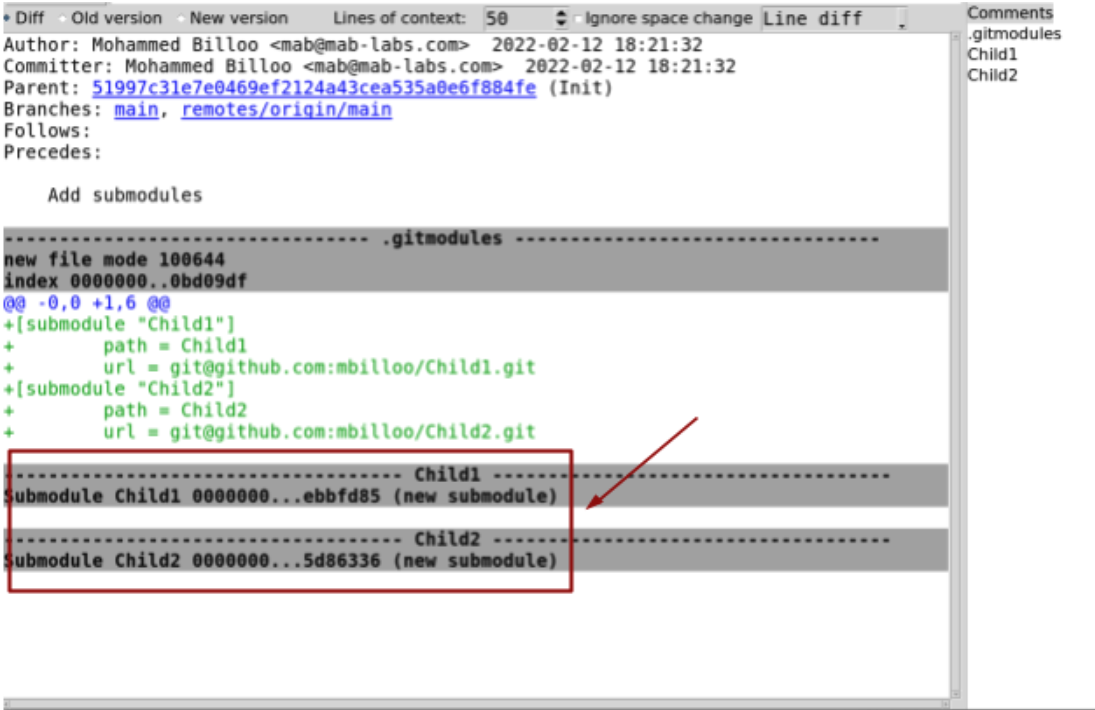
And we can see that the subdirectories are actually references to the submodules themselves.
If we wanted to clone all three repositories at once from a clean checkout, we could run the following command, from a separate directory:
>$ git clone --recursive git@github.com:mbilloo/Parent.git

The message “HEAD detached at …” tells us that when we recursively cloned the Parent repository, git checked out the Child1 repository at an individual commit, since that is what we instructed git when we made our first commit. Now, we could have instructed git to check out the submodule at a particular branch with the appropriate invocation, but that generally is not necessary to track submodules.
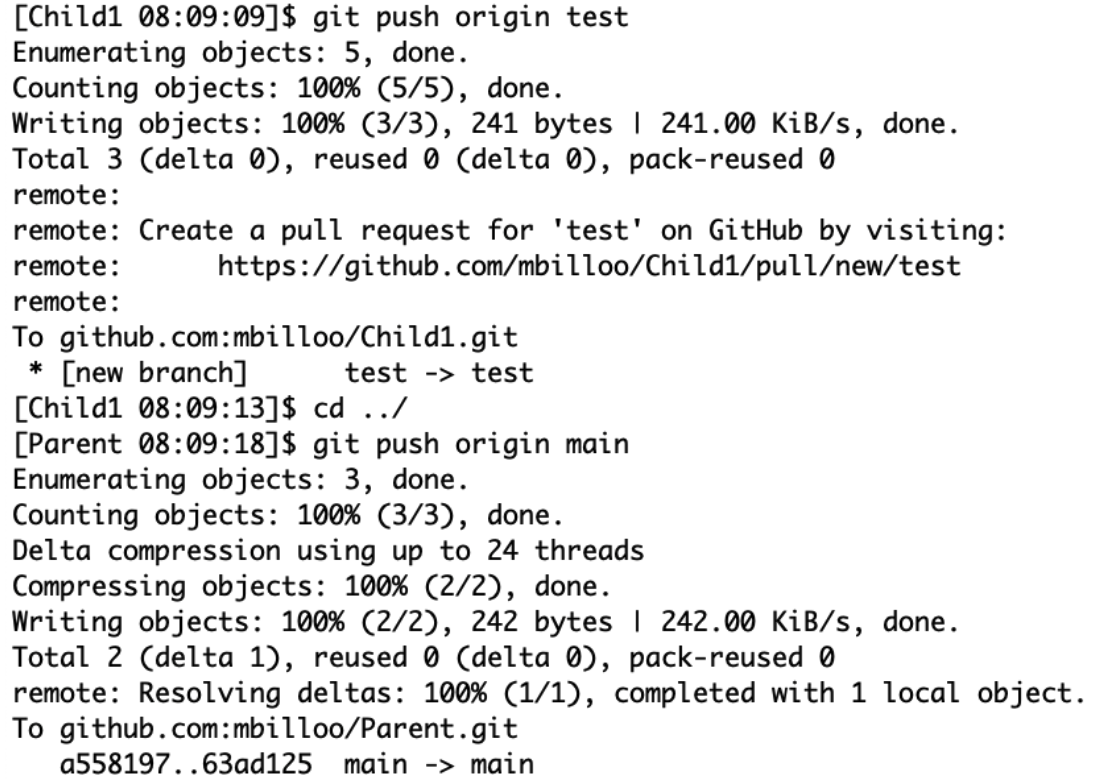
Now, let’s commit the change that we just made by creating a branch in the Child1 repository, and then adding and committing the change to the branch:

Now, if we go to the Parent repository, and execute “git status”, we that the Parent repository has detected that the Child1 repository has commits, and that the submodule reference in the Parent repository needs to be updated to point to the new commit.

We can do so by executing the following commands:

As a side note, we execute “git status” frequently to see the current state of the repository. This is a general best practice that we apply, since it gives us a view of the state of our repository, and minimizes the possibility that we have missed something. Finally, we have to push up the changes that we made to both repositories, by executing the following commands:
Now, if we do a clean recursive checkout again of the Parent repository and execute “git status” in the Child1 repository, we can see the following:

If we execute “git log” in the Child1 repository, we can see that the the commit hash of a6131d0 corresponds to our most recent commit:

Repo
Now, let’s take a look at the repo tool, which is also meant to manage multiple repositories. The key difference between repo and git submodules is that using repo requires using a tool called “repo” in addition to git, and following its guidelines.
The basis for using repo is the manifest file, which defines the remote repositories that will comprise our project. Let’s take the example of the three repositories that we defined above. In the case of repo, the Parent repository would contain our manifest file, which would in turn reference the Child1 and Child2 repositories.
To avoid having issues with the submodules that we created in the Parent repository, we’re first going to create a branch at the initial commit, which can be done using the command line or using gitk:

If we execute “git status” on the command line after creating our branch, we can see the following:

Since we checked out the repository at a commit prior to when we added the submodules, git no longer “recognizes” these repositories, and assumes that they are simple directories; hence, git asks if we want to add these directories to our repository. Instead, we can safely remove them, and if we need to recover them, we can simply check out the Parent repository at a commit where we did add the submodules.
The “standard” repo manifest file is named “default.xml” and has the following contents:
<?xml version="1.0" encoding="UTF-8"?>
  <manifest>
        <remote name="mbilloo" fetch="ssh://git@github.com"/>

        <<roject name="mbilloo/Child1.git" remote="mbilloo" path="Child1" revision="test"/>
        <project name="mbilloo/Child2.git" remote="mbilloo" path="Child2" revision="5d863365fb"/>
</manifest>
The first line is typical for any XML file, and declares that this is an XML file, and specifies the XML version and encoding that is being used. The second line contains the “manifest” element, which notifies repo that this XML file is a valid manifest file.
Line 3 specifies the URL of the remote repository. The “fetch” attribute specifies the URL of the remote repository that will be cloned.
Lines 5 and 6, which start with the “project” element, specify the complete information about the individual repositories that will be checked out. The “name” attribute specifies the remainder of the path to the remote repository, and, combined with the “fetch” attribute in the “remote” element, the complete remote URL becomes:
${remote_fetch}/${project_name}.git
The “path” attribute of the “project” element specifies the location on the local machine where the repository should be stored, relative to the current directory. Finally, the “revision” attribute specifies the commit where the remote repository should be checked out. There are two ways to specify the commit. First, the branch name can be used, which is shown in the manifest file above for the Child1 repository. In this case, the most recent commit of that branch will be the checkout location of the repository. Second, an individual commit SHA ID can be specified, which is shown for the Child2 repository. In this case, repo will check out the repository at that exact location.
The former, used for the Child1 repository, is useful during initial stages of development and testing. Using a branch, which will often change during this stage, is valuable if we would like to distribute the changes to our repository without having to update the manifest file. The latter is useful if we are past the initial stage of development and would like to lock down the locations of our repositories. Thus, if any change is made to any component of the project, a change to the manifest file will be necessary to distribute the changes.
This manifest file must be checked into the Parent repository and pushed up to the remote (remember, we checked it into the “repo-test” branch). After doing so, the git history of our Parent repository looks like the following:

Now that we have our manifest file, how do we use it? First, we will make a directory that will contain the child repositories, change our current working directory to it, and execute the following command to initialize repo:
~>$ mkdir parent_clean
~>$ cd parent_clean
~/parent_clean>$ repo init -u git@github.com:mbilloo/Parent.git -b repo-test
The “-u” option instructs repo of the URL to the repository that contains the manifest file, and the “-b” option instructs it of the branch. Then, we can execute the following command to clone the Child1 and Child2 repositories and confirm that they now exist:
~/parent_clean>$ repo sync
~/parent_clean>$ ls
Child1 Child2
To confirm that repo did indeed check out our repositories at the locations that we specified, we can change our current working directory to the Child1 repository, and run git log:

We can see that the Child1 repository has been checked out at the latest commit of the “test” branch. If we do the same for the Child2 repository, we can see that it has been checked out at the revision specified in the manifest file.

Now, let’s say we were to make a change to the Child1 repository elsewhere (not in our current repo checkout) in the same branch by executing the following commands:

If we execute “repo sync” in our checkout, change to the Child1 directory, and run git log, we can see that the repo tool has updated our Child1 repository to our latest commit on the test branch:

Let’s perform the same exercise for the Child2 repository. First, let’s commit and push up a simple change to the repository (specifically, an innocuous change to the README file) outside of where we ran repo sync:

Then, let’s return back to the directory that contains a clean version of our repositories, and run repo sync. If we change our current working directory to the Child2 repository, and execute git log from the command line, we can observe the following:

We can see that the Child repository is still checked out at the previous commit. Since we instructed repo to check out the repository to a particular commit, repo will not update the repository as more commits are added.
Summary
In this post, we’ve outlined two mechanisms that we at MAB Labs Embedded Solutions have used in our projects to manage multiple repositories: git submodules and repo. Using git submodules has the advantage that it is self-contained; no other tools are necessary. Repo, although it requires an additional tool and infrastructure work upfront, is in our opinion a cleaner solution. It allows developers to remain focused on a single repository. They don’t generally need to concerned about making or committing changes to any other repository. Additionally, repo allows a separate team to control which commits of a particular repository they wish to include. This allows two teams to work independently. In summary, we usually recommend using repo over git submodules.
In an upcoming post, we will see how to set up a gerrit server and use it in conjunction with repo to facilitate code reviews and automatic merging into the main branch of our repository.